
Nest thermostat wiring is the part of a Nest install that makes most people nervous. The good news is that Google designed the Nest base to be simple: you press a small connector button, push the wire in, and the button pops up to hold it. As long as each wire goes into the connector that matches its old terminal letter, the hard part is done.
This guide covers Nest thermostat wiring for the Nest Learning Thermostat (4th gen), the 3rd gen Learning Thermostat, the Nest Thermostat and the Nest Thermostat E. You will see which connectors each model has, how to wire a conventional furnace and a heat pump, what to do about a missing C wire, and how to fix the most common wiring errors the Nest shows after setup.
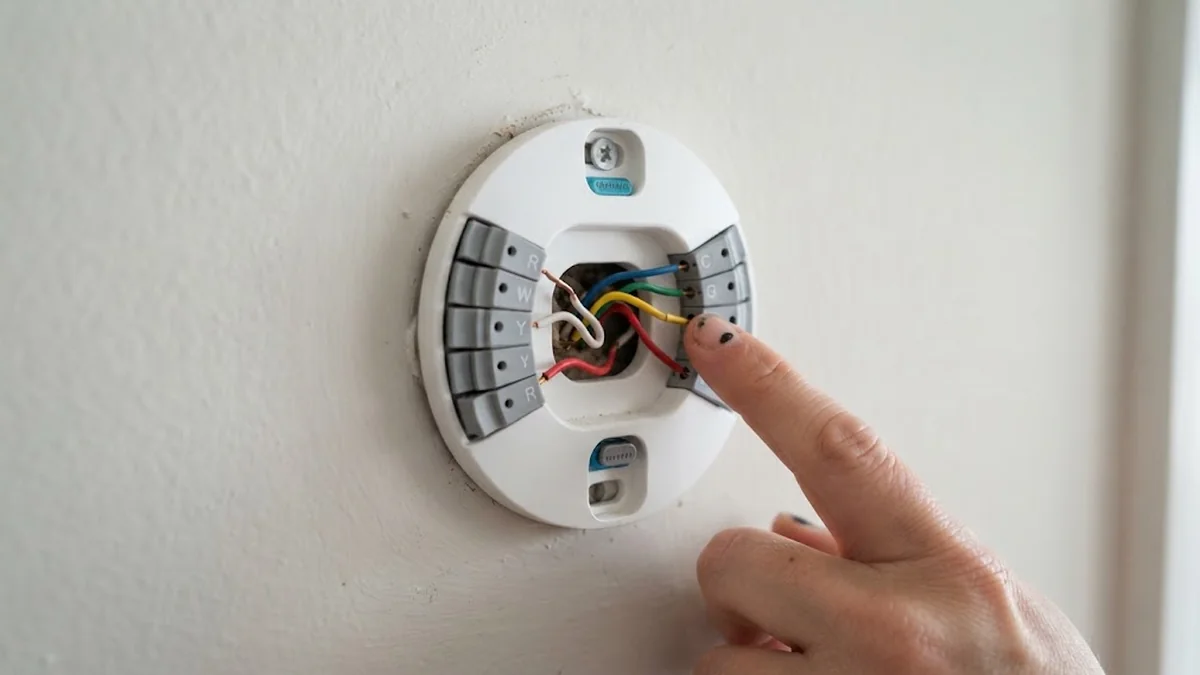
Table of Contents
- Check Compatibility Before You Buy
- Nest Thermostat Wiring Connectors by Model
- Before You Start
- Nest Thermostat Wiring: Furnace and Central Air
- Nest Thermostat Wiring: Heat Pump
- Two Wires on Rh and Rc
- What If You Do Not Have a C Wire?
- Common Nest Wiring Errors and Fixes
- After Wiring: Setup Tips
- Nest Thermostat Models at a Glance
- The Nest Power Connector Explained
- Check Wiring and Power From the Thermostat
- Support for Older Nest Thermostats
- Nest Wiring for Boilers and Radiant Heat
- Frequently Asked Questions
- Final Thoughts
Check Compatibility Before You Buy
Google’s online Nest compatibility checker asks you to photograph your current wiring and tells you which Nest models will work. Do this first. A few quick rules:
- Nest thermostats work with low voltage (24V) systems, which covers most gas, oil, electric, forced air, heat pump and radiant systems.
- They do not work with line voltage (120V or 240V) systems, such as many electric baseboard heaters. If you see thick wires joined with wire nuts, you probably have line voltage.
- Dual fuel systems (a heat pump plus a gas furnace) can work with some models, but Google strongly recommends professional installation.
Nest Thermostat Wiring Connectors by Model
Each Nest model has a different set of connectors on its base. Google’s thermostat specs page lists them in full.
| Model | Key connectors | C wire needed? |
|---|---|---|
| Nest Learning Thermostat (4th gen) | W1 to W3, Y1 to Y3, G to G3, O/B, AUX, E, C, Rh, Rc, star and AQ connectors | Rarely; Google says under 1% of systems |
| Nest Learning Thermostat (3rd gen) | W1, W2/AUX, Y1, Y2, G, O/B, C, Rh, Rc, star | Sometimes |
| Nest Thermostat | Fewer connectors for simpler systems | Required for heat only, cool only, zoned and heat pump systems |
| Nest Thermostat E | Simplified base for common systems | Rarely |
According to the Google Store spec sheet, the 4th gen Learning Thermostat supports up to three heating and three cooling stages, heat pumps with auxiliary and emergency heat, and humidifier, dehumidifier and ventilation accessories. It lists at about $279.99, with regular discounts.
Before You Start
- Turn off power to your heating and cooling system at the breaker or service switch.
- Confirm it is off by changing the old thermostat’s set point and checking nothing starts.
- Remove the old thermostat and take a clear photo of the wiring with the terminal letters visible.
- Label every wire with the stickers in the Nest box, matching the old terminal letter.
- Look for a jumper wire between R and Rc or Rh. You will not need it with a Nest; the base handles this internally.
- Remove the old wall plate and wrap the wires around a pencil so they cannot fall into the wall.
Nest Thermostat Wiring: Furnace and Central Air
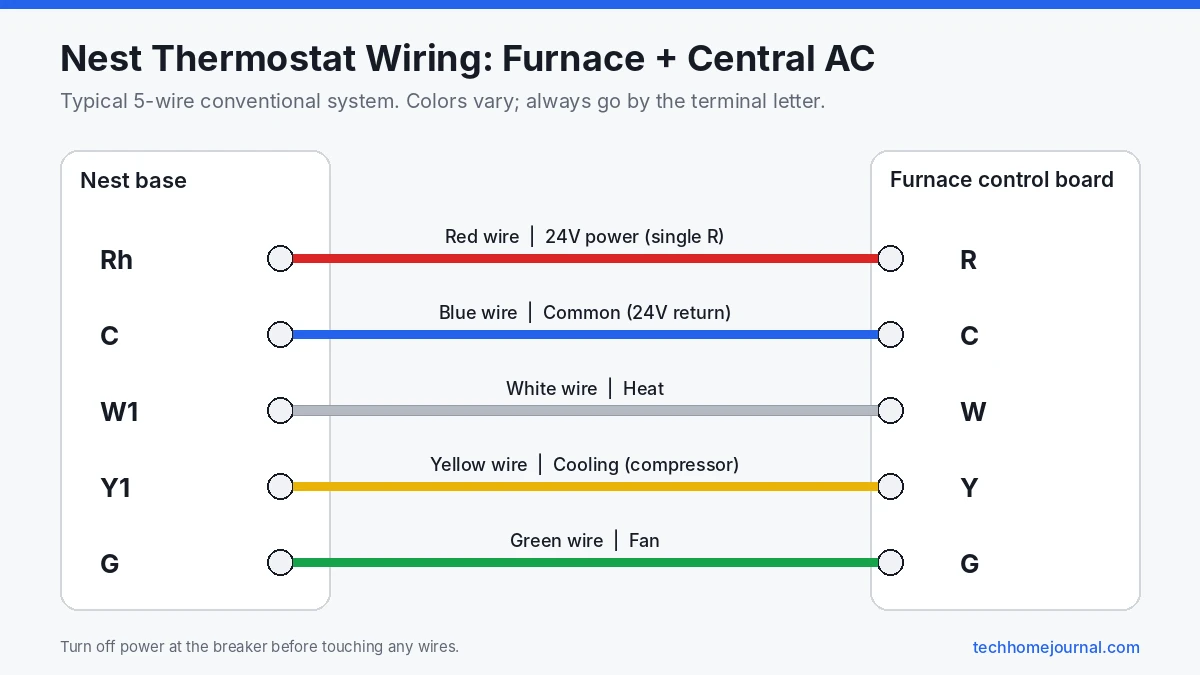
This is the most common Nest wiring setup. Connect each labeled wire to the matching Nest connector:
- R wire to Rh (or Rc; a single R wire can go in either, and the Nest connects them internally)
- C wire to C (if you have one)
- W wire to W1 (heat)
- Y wire to Y1 (cooling)
- G wire to G (fan)
To insert a wire, press the connector button down, push the straightened copper end fully in, then release. The button should stay down. If it pops up, the wire is not seated; strip a little more insulation and try again. The Nest base shows a small bubble level so you can mount it straight.
Nest Thermostat Wiring: Heat Pump
Heat pumps use the O/B wire to switch between heating and cooling:
- R to Rh, C to C
- Y to Y1 (compressor, used for both heating and cooling)
- G to G (fan)
- O or B to O/B (reversing valve)
- AUX or W2 to W2/AUX on the 3rd gen, or AUX on the 4th gen (backup heat)
- E (if present) to the star connector or E, depending on model
During setup, the Nest asks whether the O/B wire energizes in cooling (O) or heating (B). Most brands use O. If the system heats when you ask for cooling, change this setting in the thermostat’s equipment menu.
Two Wires on Rh and Rc
Some homes have two transformers, one for heating and one for cooling. You will see two red wires, labeled Rh and Rc. Put each in its matching connector. The Nest detects both and stops connecting them internally. Never put two wires into one Nest connector.
What If You Do Not Have a C Wire?
The C wire provides constant power. Google designed the 4th gen Learning Thermostat and the Nest Thermostat E to work without one in most homes, using a method Google calls Power Sharing and a built-in rechargeable battery. Google also notes that the standard Nest Thermostat needs a C wire or the Nest Power Connector for heat only, cooling only, zoned and heat pump systems.
Signs you need a C wire include a battery warning, the thermostat going offline, or the HVAC system turning on and off by itself. Your options:
- Use a spare wire in the existing cable as a C wire, connected at both the Nest and the furnace control board.
- Install the Nest Power Connector, which Google sells for systems without a C wire.
- Run a new thermostat cable with more conductors.
Our guide to smart thermostats with no C wire explains each option step by step.
Common Nest Wiring Errors and Fixes
After you attach the display, the Nest checks the wiring and shows an error if something looks wrong:
- “No power to Rh wire” (E73 and similar). The R wire is loose, the breaker is off, or the furnace door switch is open. Check the connection and the furnace panel.
- “No power to Rc wire.” Same as above, but for the cooling side. If you only have one R wire, make sure it is fully seated.
- “Wire detected but no power” on W1 or Y1. The wire may not be connected at the furnace end, or it may be a spare wire. Check the furnace control board.
- Low battery or frequent restarts. Not enough power; add a C wire or a power connector.
- Heat pump heats when you ask for cooling. Change the O/B setting in the equipment menu.
If a fuse on the furnace control board has blown, the Nest will show no power at all. Turn off the power and check the small automotive style fuse on the board, or call a technician.
After Wiring: Setup Tips
- Attach the display and follow the on-screen setup: language, Wi-Fi, location and equipment.
- Confirm the system type the Nest detects matches your equipment.
- Link it to the Google Home app. Nest thermostats are managed there now. If you use Apple Home instead, see our list of HomeKit compatible smart thermostats.
- Turn on energy saving features such as Eco temperatures. ENERGY STAR notes that certified smart thermostats are tested on real field data to confirm savings.
For a full walk through, see our smart thermostat installation guide. If you are still deciding between brands, our Nest vs Ecobee comparison covers the differences in detail.
Nest Thermostat Models at a Glance
Wiring options depend heavily on which Nest you own. This quick comparison helps you match your system before you open the wall plate:
| Model | Best for | Wiring notes |
|---|---|---|
| Nest Learning Thermostat (4th gen, 2024) | Most systems, including heat pumps and multi-stage | Full set of connectors, works with Matter, comes with a Nest Temperature Sensor in many regions |
| Nest Learning Thermostat (3rd gen) | Most systems | Full set of connectors, including the star (*) connector |
| Nest Thermostat (2020) | Simpler single-stage systems | Fewer connectors; may need a C wire or the Nest Power Connector |
| Nest Thermostat E | Simple systems (discontinued) | Limited connectors; check compatibility for heat pumps |
Before buying, run your wiring through Google’s Nest compatibility checker. It asks which wires you have and tells you whether a model will work.
The Nest Power Connector Explained
The Nest Thermostat (2020) can struggle in homes without a C wire, because it needs steady power for Wi-Fi. Google’s answer is the Nest Power Connector, a small adapter installed at your furnace or air handler. It provides power to the thermostat without running a new wire through the wall.
- It’s installed at the HVAC control board, not behind the thermostat.
- It works with many, but not all, systems. The compatibility checker will tell you if you need one.
- Many people install it themselves, but if you’re not comfortable working inside a furnace, a technician can fit it quickly.
Learning Thermostats usually handle missing C wires better thanks to their battery and power stealing, but a C wire or adapter still gives the most stable result. Our guide to smart thermostats without a C wire compares other options.
Check Wiring and Power From the Thermostat
After installation, the thermostat can show you whether the wiring is healthy:
- On the thermostat, open Settings, then Equipment to see which wires it detects and what system it thinks you have.
- On Learning models, look under Technical Info for power readings. Big swings or low values suggest a weak power supply.
- Compare the detected wires to your photo of the old wiring. A missing wire usually means it isn’t pushed far enough into the connector.
- Run a test cycle for heat, cooling and fan, and make sure the right equipment starts each time. Listen at the furnace or outdoor unit, not just at the vents.
The Google Home app also shows alerts for wiring and power problems, so turn on notifications for the thermostat.
Support for Older Nest Thermostats
Google announced in 2025 that it would end software support for the first- and second-generation Nest Learning Thermostats, along with some 3rd-gen models sold in Europe. These thermostats can keep working as basic thermostats, but they lose app control and remote features.
If you’re rewiring an older Nest, it may make more sense to replace it. Many Nest 4th gen and Nest Thermostat (2020) installs reuse the same wires, so the job is often just swapping the base and moving labelled wires across.
Nest Wiring for Boilers and Radiant Heat
Homes with a boiler, radiators or underfloor heating often have just two wires at the thermostat. Here’s what to expect:
- Two-wire boiler systems: the wires usually go to Rh (or R) and W1. Most Nest models can control this kind of system, but without a C wire they rely on battery charging and power stealing, which some boilers don’t like.
- Hot water or zone valves: in homes with several heating zones, each zone often has its own thermostat and zone valve. Check that the zone control board can supply enough power for a smart thermostat.
- Millivolt systems: some gas fireplaces and wall heaters use millivolt controls. Nest thermostats are not compatible with these.
- Outside North America: boiler systems in the UK and parts of Europe often use different wiring and a separate heat link or receiver. Follow the instructions for your region’s model.
If the compatibility checker flags your boiler, ask a heating engineer before forcing an install. A wrong connection can damage the boiler’s control board.
Frequently Asked Questions
Where does the red wire go on a Nest thermostat?
A single red wire goes into Rh (or Rc). The Nest connects the two internally when only one R wire is present. If you have two red wires, put one in Rh and one in Rc.
Does the Nest thermostat need a C wire?
The 4th gen Learning Thermostat and Thermostat E usually work without one. The standard Nest Thermostat needs a C wire or the Nest Power Connector for some systems, including heat pumps.
What goes in the Nest star connector?
The star connector accepts one extra wire, such as a third heating or cooling stage, emergency heat, or a humidifier or dehumidifier. You set what it controls during setup.
Can I install a Nest thermostat myself?
Yes, most homeowners can wire a Nest on a standard 24V system in under an hour. Hire a professional for dual fuel systems, line voltage systems or anything you are unsure about.
Why does my Nest say no power to Rh?
The R wire may be loose, the breaker may be off, the furnace door may be open, or a fuse on the furnace board may have blown.
What do I do with the jumper wire from my old thermostat?
Remove it. The Nest base connects Rh and Rc internally when needed.
Do I need the Nest Power Connector?
Only if you have a Nest Thermostat (2020) without a C wire and the compatibility checker recommends it. Learning Thermostats usually don’t need it, though a C wire still gives the most reliable power.
Can I control a Nest thermostat with the Google Home app?
Yes. Newer Nest thermostats are set up and controlled in the Google Home app, which also shows wiring and power alerts.
Will a Nest thermostat work with my two-wire boiler?
Often yes. The two wires usually connect to Rh and W1. Use the compatibility checker first, and if the boiler doesn’t like power stealing, add a C wire or ask a heating engineer about a power adapter.
What happens if I connect a Nest wire to the wrong terminal?
The thermostat usually shows a wiring error and won’t run that equipment. Turn off the power, check your labels against the photo of the old wiring, and move the wire to the right connector. Never connect a Nest to line-voltage wires, as that can damage it permanently.
Do I need to turn off the power before wiring a Nest thermostat?
Yes. Switch off the HVAC system at the breaker or furnace switch before removing the old thermostat. Touching wires together while powered can blow a fuse on the control board.
Final Thoughts
Nest thermostat wiring is mostly about careful labeling. Photograph the old wiring, label each wire by its terminal letter, push each one into the matching Nest connector until the button stays down, and let the Nest check the result. Sort out C wire power before it causes problems, and call a pro for dual fuel or line voltage systems. For more ways to make the most of your new thermostat, read our guide to smart thermostat energy savings and our roundup of the best smart thermostats.